
How to Fix Crumbling Mortar in Brick Walls (Step-by-Step Guide)
Your brick walls might be looking a bit rough lately. You know, those little cracks and crumbling bits? It happens. Bricks and mortar go through a lot, from weather to just plain old age. If you've noticed some damage, don't just ignore it. Fixing crumbling mortar isn't as hard as it sounds, and it can save you a lot of headaches down the road. Whether it's your garden wall, a Chimney Mortar Repair, or even something needing Brick and block installation services, this guide will walk you through what you need to know. We'll cover everything from figuring out what's wrong to making the repairs yourself. For bigger jobs, like Stone veneer installation, or if things look really bad, we'll also talk about when to call in the pros.

Key Takeaways
Before you start any repair, take a good look at the damage. Are the cracks small or big? Are bricks bulging or falling apart? Knowing this helps you pick the right fix.
Pick the right weather for repairs. You want it to be not too hot, not too cold, and definitely no rain or frost for a few days after you're done.
For repointing, carefully remove the old, crumbly mortar first. Then, mix up a new batch that matches the old stuff in color and strength. Pack it in tight and tool it to match the original look.
If a brick is really damaged, you might need to replace it. This means carefully taking out the old one and fitting in a new one, making sure the new mortar joints look right.
For bigger problems like wide cracks or leaning walls, you might need special techniques like stitching cracks with metal bars or even rebuilding sections. If you're unsure, it's best to get professional help.
Assessing Brick Wall Damage
Before you grab any tools, the first thing you need to do is figure out what's actually going on with your brick wall. It's not just about seeing some cracks; you need to understand why they're there and how serious they might be. Taking the time to properly assess the damage now can save you a lot of headaches and money down the road.
Understanding Crack Types and Patterns
Not all cracks are created equal. A tiny, hairline crack that's less than a millimeter wide might just be from the brick expanding and contracting with the weather. These are usually not a big deal. But if you see cracks that are wider, or if they run in a stepped pattern along the mortar lines, that's a different story. These kinds of cracks often mean the wall is moving or settling. Keep an eye on where these cracks are, too. Vertical ones near the ends of a wall or by a pier could be from temperature changes, while horizontal cracks might point to issues with wall ties or the wall leaning outwards.
Identifying Bulging, Leaning, and Spalling Bricks
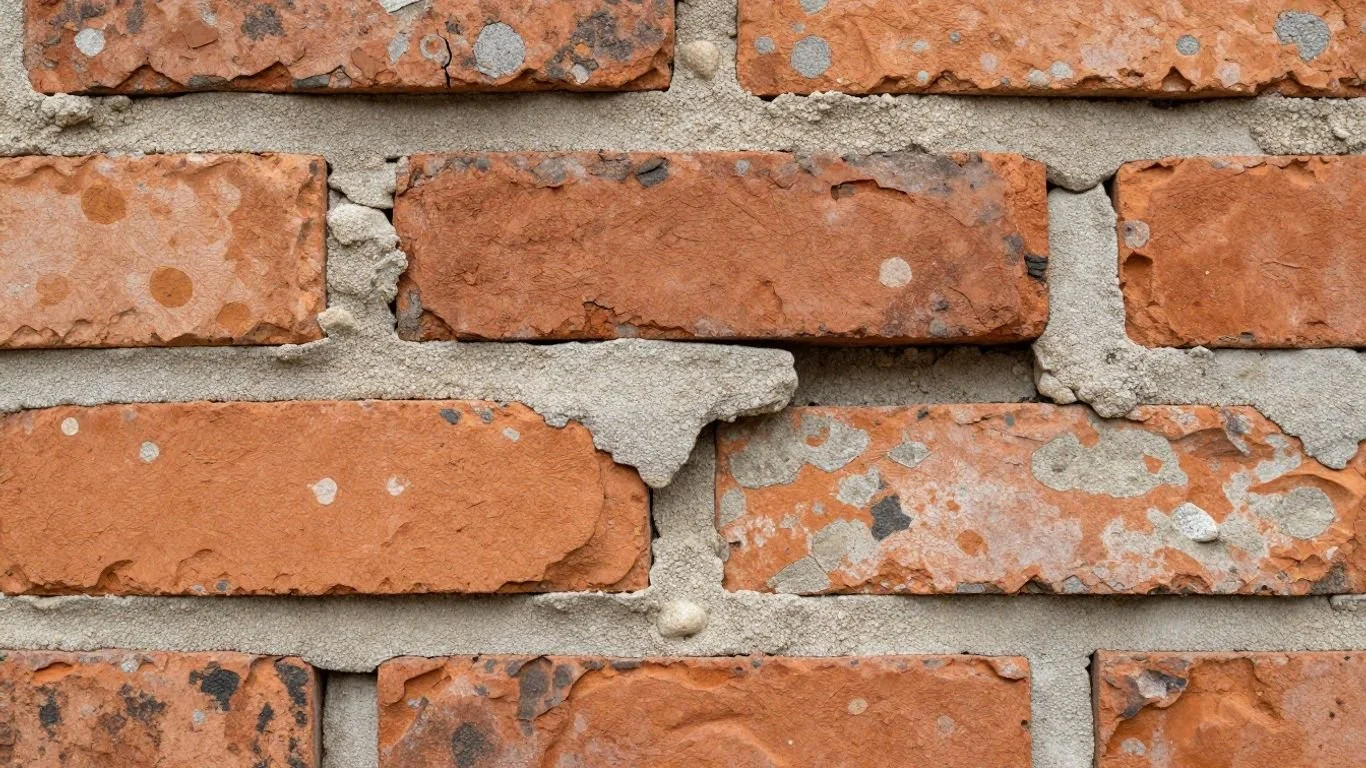
Look closely at the bricks themselves. Is any part of the wall bulging outwards? That usually means the mortar holding the bricks together has failed, or water has gotten in. This is common if the top of the wall (the coping) is damaged or missing. You might also see bricks that are leaning or the whole wall looks out of plumb. Then there's 'spalling,' which is when the face of a brick starts to flake off. This often happens when bricks get really wet and then freeze, or if a previous repair used a mortar that was too hard and trapped moisture inside the softer brick.
Evaluating Mortar Condition and Damp Signs
Your mortar is like the glue holding everything together, so its condition is super important. If the mortar is powdery and crumbles easily when you touch it, it's likely just worn out from age and weather. On older walls, sometimes people used a very hard, glassy cement mortar. While it seems strong, it can actually be too rigid for softer, older bricks and can cause them to crack or spall. Also, look for signs of dampness. This could be green moss or algae growing on the bricks, white powdery salt deposits (called efflorescence), or crumbling mortar right below the top of the wall. These can all indicate that water isn't draining away properly.
It's really important to get a good handle on the problem before you start fixing it. Think of it like a doctor diagnosing an illness before prescribing medicine. You wouldn't just start randomly patching things up without knowing what caused the issue in the first place. Understanding the type of damage, its location, and potential causes will guide you to the right repair method and materials.
Preparing For Mortar Repair
Alright, so you've checked out your brick wall and figured out what needs fixing. Before you start slinging mud, there are a few things to get sorted. It’s not just about grabbing some cement and going for it; a little prep work goes a long way to making sure your repair actually lasts.
Choosing the Right Weather Window
This is a big one. You don't want to be working in the middle of a heatwave or when there's a frost warning. Mortar needs a specific temperature range to set up properly. Too hot, and it dries out too fast, becoming weak. Too cold, and it won't cure right at all, leaving it vulnerable. Ideally, you're looking for a stretch of days where the temperature stays between 5°C and 20°C (that's about 40°F to 70°F). Also, try to avoid periods with heavy rain or strong winds. If you absolutely have to work when it's a bit warmer, you can try shading the area, and for light showers, a bit of temporary sheeting can help.
Selecting Appropriate Mortar Mixes
Not all mortar is created equal, and using the wrong kind can cause more problems down the line. For older homes with softer bricks, a lime-rich mix is usually best. It's more forgiving and lets the wall 'breathe'. A common mix might be something like 1 part cement, 2 parts lime, and 8 parts sand, or using a specific type of lime called NHL 3.5 mixed with sand. For newer, harder bricks, a simpler mix of 1 part cement to 5 or 6 parts sand often does the trick. The main thing is to try and match the strength and color of the existing mortar as closely as possible. If you're unsure, it's always better to err on the side of caution and go for a softer, more lime-heavy mix, especially if you're dealing with historic brickwork.
Ensuring Clean Edges for Optimal Adhesion
This is where the real work happens before you even touch the new mortar. You need to get all the old, crumbly stuff out of the joints. Use a chisel and hammer, or a special mortar raking tool, to carefully remove the damaged material. You want to go in about 15-20mm, or until you hit solid, sound mortar. After you've raked it out, you've got to get rid of all the dust and debris. A stiff brush, a vacuum cleaner, or even a leaf blower can help here. The cleaner and more porous the edges of the existing mortar and brick are, the better the new mortar will stick. It's like trying to glue two things together when one surface is covered in dust – it just won't hold.
A quick note on safety: When you're chiseling out old mortar and mixing new stuff, you're going to create dust. Make sure you're wearing safety glasses, gloves, and a dust mask. It might seem like a hassle, but it's way better than dealing with eye irritation or breathing in fine particles.
Here's a quick rundown of what to aim for:
Temperature: Between 5°C and 20°C (40°F - 70°F).
Moisture: Lightly dampen the surrounding bricks and mortar before applying new mix. This stops them from sucking all the water out of your fresh mortar too quickly.
Cleanliness: Brush, vacuum, or blow out all dust and loose bits from the joints. A clean surface is key for a strong bond.
Mix Consistency: Aim for a workable, 'plastic' consistency – think thick peanut butter. It should hold its shape but be easy to spread.
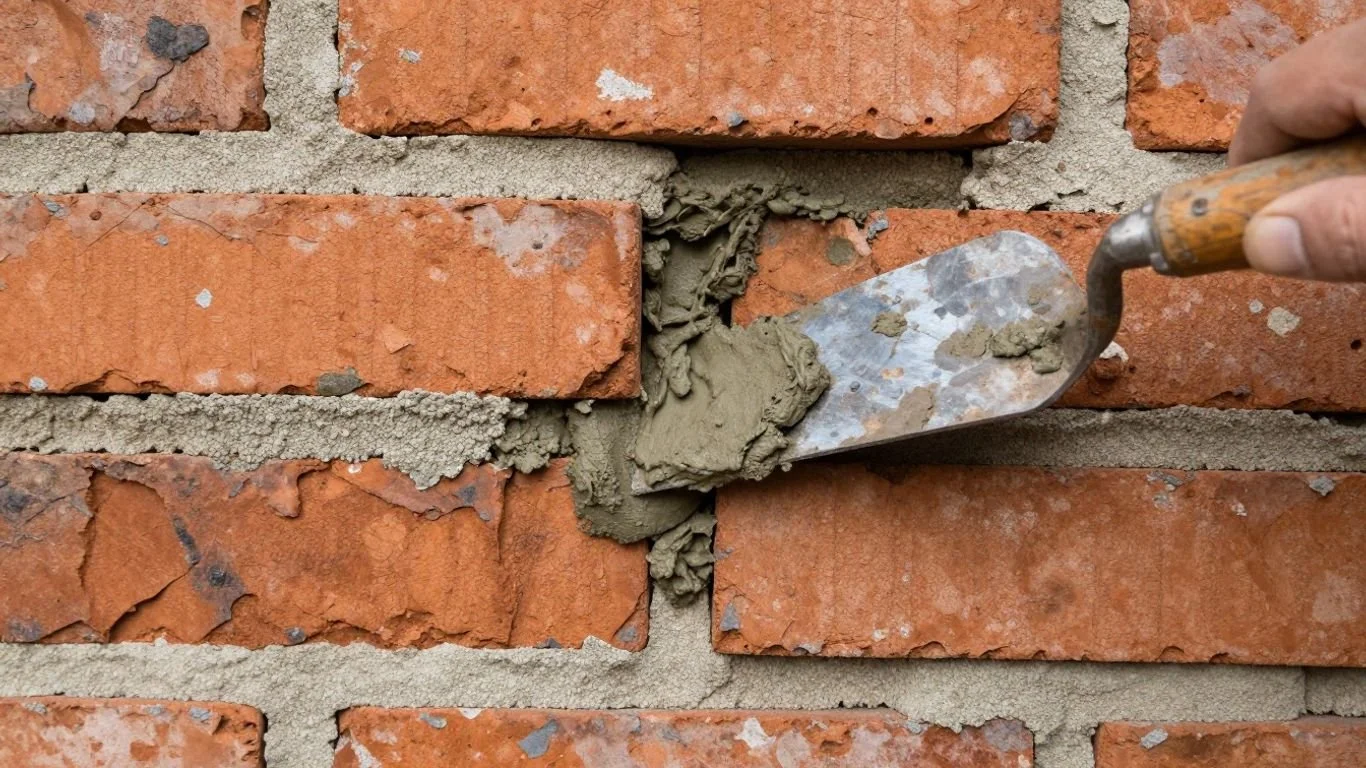
Repointing Damaged Mortar Joints
Repointing is basically giving your brick walls a fresh set of mortar "grout" where the old stuff has crumbled away. It's not just about looks, though it does make things tidy. It's about keeping the wall solid and preventing water from getting in where it shouldn't. Think of it as patching up the gaps to keep everything snug and secure.
Raking Out Old Mortar
First things first, you've got to get the old, crumbly bits out. You don't want to just slap new mortar on top of the old, weak stuff. Grab a chisel, maybe a special mortar rake if you have one, and carefully chip away the damaged mortar. You want to go in about 15-20mm, or until you hit solid material. Be gentle, though; you don't want to nick the edges of the bricks. It's a bit tedious, but important. After you've raked it out, give the joints a good brush and vacuum to get all the dust and loose bits out. This makes sure the new mortar has a clean surface to stick to.
Mixing and Applying New Mortar
Now for the fun part: mixing the new mortar. The trick here is to match the old stuff as closely as possible, both in color and strength. For older homes with softer bricks, you'll likely want a lime-based mix. For newer bricks, a cement-heavy mix might be okay. If you're unsure, it's always better to go with a softer, more breathable mix. You're aiming for a consistency like thick peanut butter – workable, but not runny. Mix only what you can use within an hour or so, because it hardens up fast. Before you start applying, lightly dampen the brickwork with water. This stops the bricks from sucking all the moisture out of your fresh mortar too quickly, which helps it cure properly. Then, using a trowel or a pointing gun, pack the new mortar firmly into the joints. Start with the horizontal ones, then do the vertical ones. Really push it in there to fill the whole space.
Tooling and Finishing Repointed Joints
Once the mortar has set a bit – you should be able to press your thumb into it without it sticking too much – it's time to shape it. This is called tooling. You want to match the profile of the original mortar joints. Common shapes are a simple flat finish (flush), a rounded one (bucket handle), or one angled to shed water (weather-struck). Use your pointing tool or even the edge of your trowel to get the shape just right. After tooling, gently brush away any smears from the brick faces. Avoid using a wet sponge, as this can sometimes leave marks on the bricks. The goal is a neat, tidy finish that looks like it's always been there. After you're done, you'll want to protect the new mortar from drying out too fast, especially if it's sunny or windy. Covering it with damp hessian or plastic sheeting for a day or two usually does the trick.
Replacing Damaged Bricks
Sometimes, a brick is just too far gone. Maybe it's cracked right through, crumbling into dust, or has a big chunk missing. When repointing isn't enough, you'll need to swap out the bad brick for a new one. It sounds a bit daunting, but it's totally doable if you take your time.
Marking and Extracting Compromised Bricks
First things first, you need to figure out which bricks are really beyond saving. Look for deep cracks, spalling (where the surface flakes off), or if the brick feels soft and powdery. Once you've identified a brick that needs replacing, you'll need to carefully remove it without messing up the ones around it.
Mark the brick: Clearly outline the brick you're going to remove. This helps you focus.
Cut the mortar: Use a grinder with a masonry blade or a bolster chisel and hammer to cut through the mortar joints surrounding the damaged brick. Go all the way through the joint, but be careful not to nick the bricks next to it. You might need to drill a few small holes in the mortar first to make it easier to break up.
Extract the brick: Once the mortar is cut, you can start wiggling the brick out. Sometimes they come out whole, but often you'll need to break it into pieces to get it out. Use a chisel and hammer to gently pry out any remaining bits. Make sure to clear out all the old mortar from the cavity where the brick sat.
Removing a brick requires patience. Rushing can lead to damaging good bricks, which just creates more work. Take your time with the cutting and extraction steps.`
Preparing the Opening for New Bricks
With the old brick gone, you've got a nice clean hole, or cavity, ready for its new occupant. Before you pop in a new brick, you need to get this space ready.
Dampen the cavity: Lightly mist the inside of the opening with water. This stops the new mortar from drying out too fast when it hits the dry brickwork.
Butter the new brick: Get your new brick ready. You'll want to apply a layer of your mixed mortar to the sides and bottom of the new brick – this is often called 'buttering'. This ensures good contact and a solid bond.
Inserting and Finishing New Brickwork
Now for the fun part: putting the new brick in place. It’s all about getting it snug and looking right.
Place the brick: Carefully slide the buttered brick into the opening. Give it a gentle tap with the handle of your trowel to seat it firmly. Make sure it lines up with the bricks around it, keeping the joint lines straight and the faces flush.
Fill the joints: Pack fresh mortar into the gaps around the new brick, both the horizontal bed joint and the vertical perp joints. You want these joints to be full and consistent, just like the rest of the wall. Aim for a joint thickness of around 10mm, but match what's already there if you can.
Tool the joints: Once the mortar is firm enough to take a thumbprint but not fully hard, use your pointing tools to shape the joints. Try to match the profile of the existing mortar – whether it's slightly rounded, flat, or angled. This makes the repair look much more natural. You can find some great tools for this at your local hardware store.
Clean up: Gently brush away any excess mortar smears from the face of the new brick and surrounding ones before the mortar sets hard. A soft brush works well for this. Let the new mortar cure properly, just like you would with repointed joints.
Addressing Structural Cracks and Movement
Sometimes, brick walls show signs of more than just worn-out mortar. You might see cracks that look like steps, or maybe a section of the wall is leaning out. These aren't just cosmetic issues; they point to bigger problems like the ground shifting or the wall losing its stability. Dealing with these structural problems needs a bit more attention than just repointing. It's about making sure the wall is sound and safe.
Stitching Cracks with Helical Bars
For those diagonal or "stepped" cracks that run along the mortar lines, especially if they're caused by some movement in the foundation or settling, helical crack stitching is a solid fix. It basically puts a strong metal bar across the crack to hold things together.
Here's the general idea:
Cut Slots: You'll need to cut narrow slots, usually about 6-10mm wide, into the mortar joints. These slots should cross the crack, typically every few courses of bricks, and extend for a meter or so on either side of the crack.
Clean and Dampen: Get all the dust out of these slots. Then, lightly dampen the area. This helps the special grout or resin stick better.
Inject and Install: Fill the slots with a special bonding agent or grout. Then, press the helical metal bar into the wet grout. Cover the bar with more grout and make sure it's packed in tight.
Finish Up: Once that's done, you'll repoint the face of the joint to match the rest of the wall. The goal is to make the repair as invisible as possible.
It's important to remember that this method fixes the crack itself, but it doesn't fix why the crack happened. You still need to figure out if there are drainage issues or problems with the foundation causing the movement in the first place.
Rebuilding Bulged or Loose Wall Sections
If a part of your wall is bulging outwards or bricks feel loose, it means the bond between the bricks has failed, or maybe water has gotten in and pushed things out of shape. This is more involved than just filling a crack.
Careful Removal: You'll need to carefully take out the loose or damaged bricks and any crumbling mortar around them. Sometimes, you might need to cut away a larger section to get to solid brickwork.
Prepare the Area: Clean out the cavity where the bricks were. Dampen the surrounding brickwork and the new bricks you're about to use.
Rebuild in Stages: Apply a fresh mortar mix to the base and sides of the opening. Carefully insert the new bricks, tapping them gently into place. Make sure the new bricks are flush with the surrounding wall and the joints are consistent. You might need to rebuild a section course by course, ensuring each new layer is level and plumb.
Finishing Touches: Once the new bricks are in, you'll finish the joints to match the existing ones. Clean off any excess mortar before it hardens.
Repairing Brick Piers and Gateposts
Gateposts and piers often take a beating. They support gates, endure weather, and can lean or crack over time. The repair process is similar to fixing a wall section, but you need to be extra careful about stability.
For gateposts, especially, ensuring they are perfectly plumb and stable is key. If a post is significantly leaning or has deep cracks, it might be best to consult a professional. They can assess if the foundation is sound or if a more extensive rebuild is needed. Sometimes, adding internal reinforcement or even replacing the entire post is the safest bet for long-term stability and function.
When repairing, focus on removing damaged bricks and mortar, preparing the opening, and then rebuilding with a strong, compatible mortar mix. Make sure new bricks are well-bedded and joints are properly filled and tooled. If you're reattaching gate hardware, ensure the new or repaired brickwork can handle the load.
Post-Repair Care and Prevention
So, you've put in the work, and your brick wall is looking much better. But don't just walk away yet! A little bit of attention after the repair can make a big difference in how long it lasts. Think of it like letting a cast set properly – you wouldn't want to put weight on it too soon.
Curing and Protecting Repaired Areas
This is a really important step. The new mortar needs time to harden up properly, and that means keeping it from drying out too fast or getting rained on. For the first 24 to 48 hours, you'll want to keep the repaired sections damp. A light misting with water a few times a day usually does the trick, especially if it's warm and sunny. You can also cover the area with damp hessian sacking or plastic sheeting. Just make sure the sheeting doesn't touch the fresh mortar directly, as it can cause discoloration. This slow curing process helps the mortar gain its full strength and bond well with the surrounding bricks.
Implementing Preventative Measures for Longevity
Now, let's talk about keeping this from happening again. The best way to deal with crumbling mortar is to stop it from crumbling in the first place. A big culprit is water. Make sure your wall's coping stones or capping course are in good shape and properly pointed. If water can't get into the top of the wall, it's less likely to cause problems lower down. Also, keep an eye on soil levels. You don't want soil piled up against the brickwork, as this holds moisture. Using something like railway sleepers to create raised beds can keep the soil away from the wall face. Regular checks, maybe once a year after winter, are a good idea. Catching small issues early, like a tiny crack or a loose bit of mortar, is way easier than dealing with a big repair later. Remember, old brick walls need to breathe, so avoid sealing them with impermeable coatings.
Considering Professional Help for Extensive Damage
While this guide covers a lot of common repairs, sometimes a wall's issues go beyond simple repointing or brick replacement. If you're seeing significant bulging, leaning, or widespread cracking, it might be a sign of deeper structural problems. In these cases, it's really best to call in a professional. They have the tools and experience to assess the situation properly and can recommend solutions like helical bar stitching for cracks or even partial rebuilding. Don't hesitate to get a quote from a qualified mason or structural engineer if the damage looks serious. It's better to be safe than sorry, and a professional can give you peace of mind that the job is done right. You can also find more information on annual brick and Stone Masonry inspections to help maintain structural integrity. Inspect brick and stone masonry annually to catch problems early.
Wrapping Up Your Mortar Repair Project
So, you've tackled the crumbling mortar, and hopefully, your brick wall is looking and feeling a whole lot better. It might not have been the most glamorous job, but taking the time to fix those joints or replace a few worn-out bricks makes a real difference. Remember, keeping an eye on your brickwork and doing these kinds of repairs early can save you a lot of headaches down the road. Plus, there's a certain satisfaction in knowing you've helped keep your home or garden structure solid and looking good for years to come. Don't forget to let that new mortar cure properly, and maybe give yourself a pat on the back for a job well done!
Frequently Asked Questions
-
You'll want to pick a day that's not too hot or too cold, ideally between 50°F and 70°F (around 15°C to 20°C). Also, make sure there's no rain expected, especially not freezing rain or frost. If it's very sunny, you might need to shade your work area, and a light covering can protect it from brief showers.
-
It really depends on your bricks. For older, softer bricks, a mix with more lime is better because it's gentler and lets the wall 'breathe.' For newer, harder bricks, a mix with more cement is usually fine. The main thing is to try and match the strength and color of the old mortar as closely as possible.
-
You should aim to remove the old, crumbly mortar to a depth that's about two to two-and-a-half times the width of the joint. The goal is to get down to the solid, sound mortar underneath so the new stuff has a good base to stick to. Be careful not to damage the edges of the bricks while you're doing this.
-
Wetting the bricks lightly before you put in new mortar is super important. It stops the dry bricks from sucking all the water out of the new mortar too quickly. If the mortar dries out too fast, it won't set properly, and your repair won't last as long.