
10 Essential Masonry Techniques Every Contractor Should Master
Hey there! So, you're looking to get better at building with bricks and stones? That's awesome. Masonry is a craft that's been around forever, and for good reason. It makes things look good and last a long time. Whether you're a contractor looking to add some skills or just someone who likes building things, knowing some key techniques can make a big difference. We're going to cover the basics, from picking the right materials to putting them in place, and even some specific projects like fireplaces. Let's get started!
Key Takeaways
Mastering the differences between Full and Thin Stone Veneers MN is important for choosing the right look and application.
Understanding how to properly prepare surfaces is the first step to a long-lasting brick or stone veneer project.
Getting the mortar mix just right and applying it correctly is vital for a strong bond.
Learning various stone and brick laying techniques helps achieve precise and attractive patterns.
Specialized projects, like Brick Veneer Fireplaces in Minnesota, and working with companies like Murphy Masonry, offer opportunities to refine your skills.
Understanding Stone and Brick Veneers: The Foundation of Your Craft

When you're looking at building something with bricks or stone, it's not just about picking out pretty materials. You really need to get a handle on what makes them tick, so to speak. This is where understanding veneers comes in. Think of veneer as a decorative layer, usually thinner than a full structural material, that gives a building its look. It’s like the stylish outfit your house wears, but it still needs a solid foundation underneath.
Full Stone Veneers: Durability and Aesthetic Appeal
Full stone veneers are basically solid pieces of natural stone, cut to a consistent thickness. They're not just for show; they add serious weight and durability. Because they're natural, each piece has its own unique color, texture, and shape, which gives a really authentic, rugged look. This kind of veneer is tough and can handle a lot of wear and tear, making it a great choice if you want something that looks like it’s been there forever and will last just as long. It’s a bit more labor-intensive to install because of the weight, but the end result is often worth it for that classic, substantial feel.
Thin Stone Veneers: Versatility and Modern Applications
Thin stone veneers are, as the name suggests, much thinner slices of natural stone. They can be made from the same types of stone as full veneers, like granite or limestone, but they’re lighter and easier to work with. This makes them super versatile. You can use them in places where a full stone veneer might be too heavy or impractical, like on upper floors or even interior accent walls. They give you that stone look without all the extra structural support needed for full stone. Plus, they often come in pre-packaged panels or individual pieces that can speed up installation. It’s a good option if you like the natural beauty of stone but want more flexibility in design and application.
Brick Veneers: Classic Charm and Timeless Appeal
Brick veneers are made from fired clay, just like traditional structural bricks, but they’re typically thinner and designed to be a non-load-bearing layer. They offer that familiar, warm aesthetic that people have loved for ages. You can find them in a huge range of colors, sizes, and textures, from smooth and uniform to rough and rustic. This variety means you can achieve a lot of different looks, whether you’re going for a historic feel or something more contemporary. Installing brick veneer is generally more straightforward than stone, and it’s a popular choice for its balance of classic good looks, durability, and relative ease of installation. It’s a material that just doesn’t seem to go out of style.
When choosing between stone and brick veneers, consider the overall design goals, the structural requirements of the project, and the desired aesthetic. Each material brings its own unique character and performance to the table, influencing both the look and the longevity of the finished work.
Essential Masonry Techniques for Veneer Installation
Alright, so you've picked out your stone or brick, and you're ready to make some magic happen. But before you start slinging mortar, there are a few key techniques that separate a good job from a truly great one. Getting these basics right is what makes your veneer look sharp and last for ages.
Proper Substrate Preparation: The Key to Longevity
Think of the substrate – that's the surface your veneer will stick to – as the foundation for your veneer's success. If it's not prepped right, you're asking for trouble down the road. We're talking about making sure it's clean, sound, and ready to hold everything up. This usually means getting rid of any old paint, loose bits, or anything that might stop the mortar from grabbing on tight. For wood, you'll often need a lath or a special mesh to give the mortar something to grip. It’s a bit of grunt work, but skipping this step is like building a house on sand.
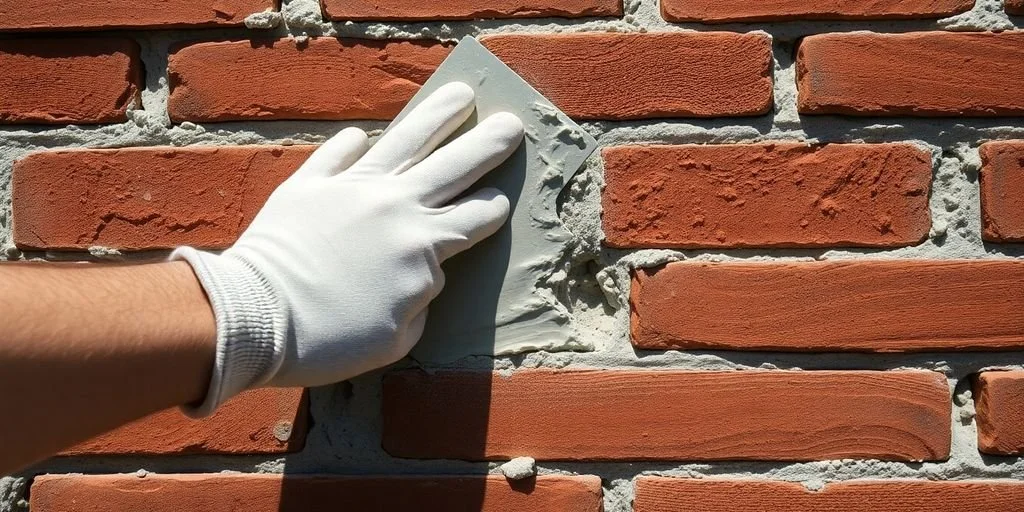
Mortar Mixing and Application: Achieving the Perfect Bond
Mortar is basically the glue that holds your veneer together. Getting the mix right is more art than science, but there are some rules. You want a mix that's workable – not too stiff, not too soupy. A good consistency means it spreads easily with your trowel and fills all the nooks and crannies. Too dry, and it won't bond well; too wet, and it might sag or crack. You'll typically mix cement, lime, and sand with water. The exact ratios can change depending on the type of veneer and the weather, so it's good to have a standard recipe and then adjust as needed. Applying it evenly is just as important; you want a consistent layer on the back of each brick or stone, and enough to fill the joints properly.
Stone and Brick Laying Techniques: Precision and Pattern
This is where the visual aspect really comes into play. Whether you're laying brick or stone, you need to be precise. Each piece needs to be set firmly into the mortar bed. You'll use your trowel to tap it into place, making sure it's level and plumb (that means perfectly vertical). The spacing between your units, called the joint, needs to be consistent for a clean look. Different patterns, like running bond for brick or random ashlar for stone, require different laying approaches. It’s about keeping your lines straight and your spacing even, piece by piece. A little wiggle with the trowel helps settle the unit and squeeze out excess mortar, which you'll then clean up.
Grouting and Jointing: The Finishing Touches
Once your veneer is laid, you've got those gaps between the units – the joints. These aren't just there to fill space; they're a big part of the final look. You'll use a special tool, often called a jointer, to shape the mortar in these joints. Common profiles include concave, V-shaped, or raked joints. This not only makes the wall look neat but also helps shed water. You want to pack the mortar firmly and then tool it when it's firm but not fully hard. After tooling, you'll brush away any loose mortar crumbs.
The goal with these techniques is to create a veneer that looks good and performs well. It's about building something that's not just pretty but also strong and resistant to the elements. Paying attention to the details, from the substrate to the final joint, makes all the difference in the long run.
Specialized Applications: Elevating Your Masonry Skills
Beyond the basics of laying bricks and stones, there are some really cool specialized applications that can make your masonry work stand out. These projects often require a bit more finesse and attention to detail, but the results can be incredibly rewarding. Think about adding a custom fireplace or working with specific types of stone – these are the things that really show off your skill.
Creating Stunning Brick Veneer Fireplaces
Fireplaces are often the heart of a home, and a well-executed brick veneer can add so much warmth and character. It’s not just about stacking bricks; it’s about creating a focal point that’s both beautiful and functional. You’ll want to pay close attention to the bond pattern, as different patterns can dramatically change the look. For instance, a running bond is classic, but a herringbone pattern can add a real touch of elegance.
Here are a few things to keep in mind:
Mortar Color: The color of your mortar can make a big difference. A dark mortar can make the bricks pop, while a lighter mortar can create a more subtle, blended look.
Brick Selection: Not all bricks are created equal. Consider the size, texture, and color of the bricks to match your home’s style.
Cleanliness: Keeping the bricks and surrounding areas clean during the process is key to a professional finish.
Proper ventilation and adherence to building codes for fire safety are absolutely non-negotiable when building any kind of fireplace. Always double-check local regulations before you start.
Working with Murphy Masonry: Best Practices for Quality Results
When you get into more specialized projects, you might encounter specific materials or techniques that require a particular approach. For example, if you're working with a company like Murphy Masonry, they might have their own preferred methods or materials that have proven effective over time. It’s always a good idea to understand the specific requirements of the materials you’re using.
For instance, different types of stone, like granite or limestone, have varying densities and porosity, which can affect how they bond with mortar and how they weather.
Material Compatibility: Always check if the mortar you’re using is compatible with the specific type of stone or brick. Some materials can react negatively with certain mortar mixes.
Weather Considerations: Understand how different weather conditions might affect your work. Extreme temperatures can impact mortar curing times and strength.
Tool Maintenance: Keep your tools in good condition. Clean trowels and sharp hammers make a world of difference in the quality of your work. You can find great masonry tools at places that specialize in construction supplies.
Getting familiar with these specialized applications can really set your masonry skills apart. It’s about taking that solid foundation and building something truly unique and impressive.
Wrapping Up Your Masonry Journey
So, we've covered a lot of ground on essential masonry techniques. It's a craft that really combines skill with a bit of artistry, and honestly, there's a real satisfaction in building something solid with your own hands. Whether you're laying bricks for a garden path or working with stone for a feature wall, remember that practice is key. Don't be afraid to start with smaller projects and build your confidence. There are tons of resources out there, from online guides to local workshops, that can help you along the way. Keep learning, keep building, and enjoy the process of creating something lasting and beautiful.